The Asphalt Shingle Roof Installation Process Explained Step by Step
People searching for asphalt shingle roof installation often want to understand the step-by-step process and how local contractors can expertly handle each stage.
Understanding the asphalt shingle roof installation process explained step by step can provide property owners with valuable insights into what to expect when upgrading or replacing their roof. Whether planning a new installation or considering repairs, knowing the sequence of tasks involved helps ensure informed decisions and smooth project management. For residents in the area, exploring this topic can also highlight the importance of working with experienced local contractors who specialize in asphalt shingle roofing, ensuring the work is done efficiently and to high standards.
Readers interested in this process might be property owners facing roof aging, damage, or simply seeking to improve their home's protection and curb appeal. Learning about each stage of installation can demystify the process and foster confidence in choosing the right service providers. Local contractors who focus on asphalt shingle roof installation bring practical expertise to the table, helping property owners achieve durable, attractive results. Keep reading to gain a clearer picture of how professional roof installation unfolds and how local professionals can assist throughout the project.
- Asphalt shingle roof installation is needed when a homeowner wants to replace an aging or damaged roof, and local contractors follow a systematic process to ensure proper setup. New asphalt shingle roofing is suitable for those building a new home or upgrading an existing roof, with service providers carefully preparing the roof deck first. Roof replacement with asphalt shingles is often sought after storm damage or wear, with local pros removing old materials and inspecting the underlying structure. Re-roofing asphalt shingles can be a solution for roofs nearing the end of their lifespan, where local contractors handle the installation step by step for durability. Asphalt shingle roof upgrades are common when upgrading style or performance, with service providers guiding through the installation process to meet project goals.
When homeowners search for the asphalt shingle roof installation process explained step by step, they are often trying to understand what to expect when replacing or installing a new roof. This topic typically relates to projects involving roof upgrades, repairs, or complete replacements. People may be concerned about the different stages involved, the materials used, and how the work is carried out to ensure durability and proper function. Understanding this process helps homeowners make informed decisions and prepare for the project, especially when coordinating with local contractors who specialize in asphalt shingle roofing.
The process of installing an asphalt shingle roof generally involves several key phases, starting with an initial assessment of the existing roof and planning the scope of work. Once preparations are complete, local service providers usually begin by removing the old roofing materials, inspecting the underlying structure, and making necessary repairs. This is followed by installing new underlayment, which acts as a moisture barrier, and then carefully laying down the asphalt shingles in a precise pattern. Each step is crucial for ensuring the longevity of the roof and its ability to withstand weather elements, making it important for homeowners to understand how experienced local contractors handle these tasks.
The types of properties that typically come up in discussions of asphalt shingle roof installation include residential homes, especially single-family houses, but also multi-family buildings and small commercial properties. These structures often feature pitched roofs, which are ideal for asphalt shingles due to their ability to shed water effectively. Homeowners with different architectural styles, from traditional to contemporary, may consider asphalt shingles because of their versatility and aesthetic appeal. When planning a roof replacement, property owners usually seek out local pros who can adapt the installation process to fit the specific design and structural needs of their property.
Understanding the asphalt shingle roof installation process explained step by step helps homeowners see how local contractors contribute to successful projects. These professionals bring the expertise needed to navigate each phase, from initial assessment to final inspection, ensuring the work is done correctly and efficiently. For property owners considering a roof upgrade or replacement, connecting with experienced local service providers can provide clarity on what the process entails and how their property will be protected throughout the project. This knowledge also helps homeowners coordinate their plans with trusted experts who understand the nuances of asphalt shingle roofing and property-specific requirements.
Roofing Repair Projects - these projects involve similar planning and preparation processes, requiring attention to detail and precise tool use like those used in asphalt shingle roof installation services.
Gutter Installation Services - installing gutters alongside roofing projects demands knowledge of roofing structures and the use of specialized tools, similar to those needed for asphalt shingle installation.
Attic Insulation Projects - proper insulation installation involves planning and layering techniques comparable to the steps involved in asphalt shingle roof installation services.
Roof Ventilation System Installation - this work requires understanding roofing frameworks and using specific tools, paralleling the skills used in asphalt shingle roof installation processes.
Roof Inspection and Assessment - detailed inspections require familiarity with roofing components and planning, skills also essential for asphalt shingle roof installation services.
Flashing and Leak Repair Projects - these repairs involve precise sealing and material handling similar to the tasks performed during asphalt shingle roof installation services.

When comparing local contractors for asphalt shingle roof installation services, it is important to consider their experience with similar projects. Homeowners should look for service providers who have a proven track record of successfully completing asphalt shingle roof installations, as this indicates familiarity with the specific steps involved in the process. A contractor’s history of handling projects comparable in size and complexity can provide confidence that they understand the nuances of the installation, from preparing the roof deck to applying the shingles correctly. Verifying references or reviews from previous clients can offer insight into the quality of their work and their ability to deliver results that meet expectations.
Clear written expectations are essential when evaluating potential service providers. Homeowners should seek contractors who provide detailed descriptions of the installation process, including the scope of work, materials used, and the sequence of steps involved. This transparency helps ensure that everyone is aligned on what the project entails and reduces the likelihood of misunderstandings. A reputable contractor will be willing to explain their approach and clarify any questions about the process, demonstrating professionalism and a commitment to clear communication.
Good communication and reputable references are key factors in choosing a reliable contractor. Service providers who maintain open lines of communication and respond promptly to inquiries are more likely to keep homeowners informed throughout the project. Additionally, seeking out references or reviews from previous clients can help gauge the contractor’s dependability and quality of work. These insights can reveal how well the contractor manages the installation process, handles issues if they arise, and ensures the project progresses smoothly. Prioritizing these qualities can lead to a more positive experience and a successful asphalt shingle roof installation.
Property owners often search for the asphalt shingle roof installation process explained step by step when they are planning practical projects around their homes and businesses. Local pros provide Asphalt Shingle Roof Installation services for everyday jobs and straightforward project options.

Homeowners often seek out information on the asphalt shingle roof installation process explained step by step to better understand what’s involved in replacing or upgrading their roof. Many property owners in the area want to ensure their homes are protected from weather elements and are considering professional services to handle the job efficiently. Knowing the general steps involved, such as removing old roofing materials, preparing the roof deck, and installing new shingles, can help homeowners make informed decisions when comparing local contractors. This process is a common concern for those aiming to improve their home’s durability and curb appeal with a reliable, professionally installed asphalt shingle roof.
Understanding the typical installation process also helps property owners identify what to expect during a roof replacement project. Local contractors usually follow a sequence that includes inspecting the existing roof, repairing or reinforcing the underlying structure, and carefully laying down new asphalt shingles for a long-lasting finish. Many homeowners look up this information to confirm that their chosen service providers follow proper procedures and to ensure a smooth, hassle-free experience. Connecting with experienced local service providers can help ensure the process is handled correctly, giving property owners confidence in their roof’s performance and longevity.
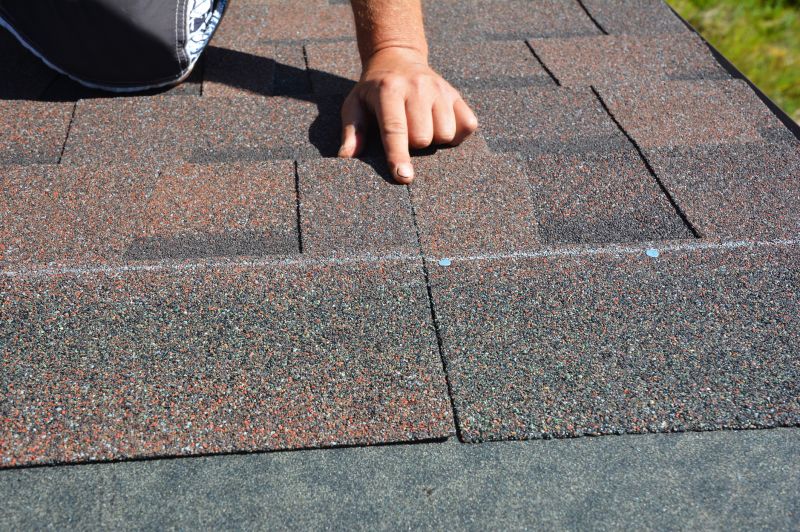
What are the main steps involved in the asphalt shingle roof installation process explained step by step? The process typically includes removing the existing roof, inspecting and preparing the roof deck, installing underlayment, laying down the asphalt shingles, and finishing with flashing and ridge vents. Local contractors can handle each of these steps to ensure a proper installation.
How do local contractors prepare the roof surface before installing asphalt shingles? They inspect the roof deck for damage, repair any issues, and install a waterproof underlayment to provide a protective layer before shingle installation begins.
What is the importance of proper underlayment in the asphalt shingle roof installation process? Proper underlayment acts as a moisture barrier, helps prevent leaks, and extends the lifespan of the roof, making it a critical step that local pros carefully execute.
How do professionals ensure the asphalt shingles are installed correctly during the process? They follow manufacturer guidelines for spacing and nailing, ensure proper alignment, and secure shingles firmly to withstand weather conditions, which local service providers are experienced in doing.
What finishing touches are typically added at the end of the asphalt shingle roof installation? The process concludes with installing flashing around roof penetrations, sealing ridge vents, and inspecting for proper coverage-all tasks performed by local contractors to complete the installation properly.
Understanding the roof replacement process - property owners can learn about the steps involved in asphalt shingle roof installation to better plan their project with local contractors.
Preparing the roof for installation - homeowners can ensure their property is ready for the work, such as clearing the area and making necessary repairs, with guidance from local pros.
Selecting the right shingles and materials - property owners can choose suitable asphalt shingles that match their style and durability needs, with help from local service providers.
Scheduling and coordinating the project - property owners can plan the timing of the installation to minimize disruptions, working with local contractors to set up a smooth process.
If you are thinking about the asphalt shingle roof installation process explained step by step for a property, this guide is meant to help you understand this topic, the typical project types, and how different options might fit your plans.
When you are ready, you can use the quote form on this page to share a few details about your project. From there, local pros can review the basics and follow up with options that match what you have in mind.